- Step-by-step setup guide for the OneKey Classic 1S hardware wallet covering unboxing, PIN creation, and seed phrase backup
- Practical security verification steps including tamper-evident packaging checks and recovery phrase testing
- Real-world first transaction walkthrough with common troubleshooting tips for Bluetooth pairing and app connection
🔐 Get 10% off OneKey — readers-only link
The link below auto-applies a 10% discount at checkout. Free worldwide shipping on orders over $89.
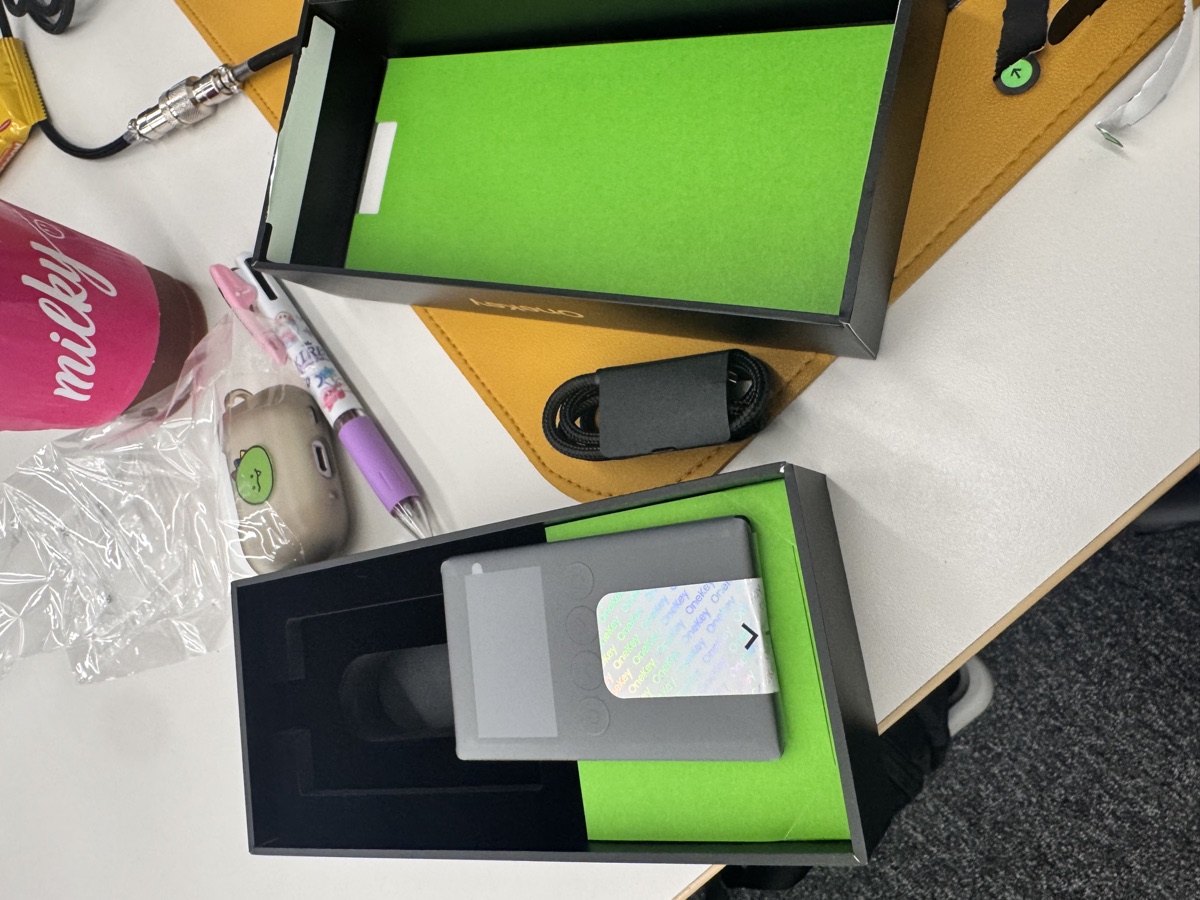
OneKey Classic 1S Setup Guide: Hardware Wallet for Beginners
I’ve been using software wallets for years, but after watching yet another MetaMask phishing scam unfold on Twitter, I finally bit the bullet and ordered a hardware wallet. The OneKey Classic 1S arrived last week, and I’m documenting the entire setup process here—mostly so I remember what I did, but also because every guide I found online skipped the parts I actually got stuck on.
Why I Picked the OneKey Classic 1S
I compared several hardware wallets before settling on this one. Here’s what mattered to me:
| Feature | OneKey Classic 1S | Ledger Nano S Plus | Trezor One |
|---|---|---|---|
| Price | ~$99 | ~$79 | ~$69 |
| Bluetooth | Yes | No | No |
| Secure Element | EAL6+ certified chip | EAL5+ certified chip | General-purpose MCU |
| Multi-chain Support | Extensive (100+) | Extensive (5,000+) | Moderate |
| Token Support | 30,000+ | 5,500+ | Varies by chain |
The Bluetooth support was a deciding factor. I wanted to use it with my phone without carrying a USB-C adapter everywhere. The secure element has EAL6+ certification—the same security level used in passports and high-security applications.
Unboxing and Verification
This is the part most guides gloss over, but it’s critical. Hardware wallets are high-value targets for supply chain attacks.
What I checked:
- Tamper-evident seal: The box had a holographic sticker that tears when you peel it. Mine was intact.
- Serial number match: The number on the device matched the one on the box and the certificate inside.
- Firmware integrity: The device verifies its own firmware on first boot. You’ll see a checkmark icon if it passes—don’t skip this screen.
- Official source: I downloaded the OneKey app only from the official website (onekey.so) or official app stores—never from third-party links.
One thing that threw me off: the device came completely dead. I had to charge it for about 20 minutes before it would turn on. The manual doesn’t mention this clearly.
Initial Setup: PIN and Seed Phrase
The device walks you through setup with on-screen prompts, but here’s what actually happens:
PIN Creation
You’ll set a 4-8 digit PIN using the physical buttons. I went with 6 digits—short enough to not be annoying, long enough to survive casual shoulder surfing.
Pro tip: The device shows a scrambled number pad on screen, and you use the physical buttons to select numbers. This prevents keyloggers from capturing your PIN even if your computer is compromised.
Seed Phrase Generation
This is where things get real. The device generates a 12-word recovery phrase. You write it down on the included card (or somewhere safer—I used a metal backup plate).
What I learned the hard way:
- The device shows each word individually. You can’t go back to see previous words, so write them down immediately.
- The words come from the BIP39 standard wordlist—a specific set of 2,048 English words designed to be unambiguous and easy to spell.
- The device will quiz you on random words to verify you wrote them down correctly. I failed this twice because I confused “coral” with “carol.”
Never, ever:
- Type your seed phrase into any computer or phone
- Take a photo of it
- Store it in a cloud service, password manager, or encrypted file
- Share it with anyone claiming to be “support”
I keep my seed phrase in a fireproof safe. Paranoid? Maybe. But I’d rather explain paranoia to friends than explain how I lost my crypto.
The Recovery Test Nobody Does
Here’s what separates people who actually own their crypto from people who think they do: test your recovery before you send real money.
I wiped the device immediately after setup and restored it using just the seed phrase. It took about 3 minutes. All settings were gone, but the wallet addresses remained identical—exactly what should happen.
If you skip this step and your seed phrase backup is wrong, you won’t find out until it’s too late.
Firmware Updates
Before connecting to any blockchain, check for firmware updates. Hardware wallet manufacturers regularly patch security vulnerabilities and add features.
In the OneKey app, go to Settings > Device > Check for Updates. The device will display a confirmation prompt—verify the update details on the device screen before approving. Never update firmware from unofficial sources.
Connecting to the OneKey App
The mobile app (iOS/Android) connects via Bluetooth. Desktop requires USB-C.
Bluetooth pairing steps:
- Enable Bluetooth on the device (Settings > Bluetooth > On)
- Open the OneKey app and tap “Add Wallet”
- Select “Classic 1S” and wait for the pairing screen
- Confirm the pairing code matches on both device and phone
I had to retry pairing twice because I tapped “Confirm” on the app before confirming on the device. The timeout is pretty aggressive—about 10 seconds.
Once connected, you’ll see all supported chains in the app. I enabled Ethereum, Bitcoin, Solana, and Polygon to start.
Your First Transaction
I sent a small amount of ETH from an exchange to test everything end-to-end.
The receiving process:
- In the OneKey app, go to Ethereum > Receive
- The device displays your address on-screen. Verify it matches the app exactly.
- Copy the address and paste it into your exchange as the withdrawal destination
- Wait for the transaction to confirm
- Check the OneKey app—balance updated automatically
Sending was equally straightforward:
- App > Ethereum > Send
- Enter recipient address and amount
- Review transaction on the device screen
- Confirm with physical button press
The device shows the full recipient address, amount, and gas fee on its screen. This is the whole point—even if your phone is compromised, you can verify the real transaction details on the isolated device.
FAQ
Q: What happens if I lose the device?
Your crypto isn’t stored on the device—it’s on the blockchain. The device just holds the private keys. If you lose it, buy a new hardware wallet (doesn’t have to be OneKey), restore using your 12-word seed phrase, and you’re back in business. This is why protecting your seed phrase matters more than protecting the device itself.
Q: Can I use this with MetaMask or other software wallets?
Yes. The OneKey Classic 1S works as a signer for MetaMask, Rabby, and most other Ethereum wallets. You connect it like you would a Ledger or Trezor. Your seed phrase stays on the device—the software wallet just sends transactions to it for approval.
Q: Is Bluetooth secure enough for a hardware wallet?
The Bluetooth connection only transmits unsigned transactions and public data. Your private keys never leave the device, and all signing happens internally on the secure element. An attacker intercepting Bluetooth traffic could see which addresses you’re interacting with, but they can’t steal funds or modify transactions without physically compromising the device.
Q: How often should I update the firmware?
Check for updates monthly or whenever the app notifies you. Security patches are critical—outdated firmware may have known vulnerabilities.
Final Thoughts
Setup took about 45 minutes including the recovery test. The device itself feels solid—better build quality than I expected at this price point. The buttons are clicky and responsive, and the screen is bright enough to read in sunlight.
Who this wallet is for:
- Anyone holding meaningful amounts of crypto
- DeFi users who connect to multiple protocols
- People who want mobile compatibility without USB adapters
Who should look elsewhere:
- If you need airgapped QR code signing, look at higher-end models with air-gapped operation
- If you want the absolute cheapest option and don’t need Bluetooth, USB-only variants are available
- If you’re only holding Bitcoin and want fully open-source firmware, Trezor might be a better fit
The hardware wallet learning curve is real, but it’s worth the effort. Once you understand that the device protects your keys while letting you verify every transaction on a trusted screen, the security benefits become clear.
Now I just need to figure out where to hide this seed phrase card so I don’t forget where I put it.
🔐 Get 10% off OneKey — readers-only link
The link below auto-applies a 10% discount at checkout. Free worldwide shipping on orders over $89.
Disclosure: This post contains affiliate links. If you buy through them, you get 10% off and I earn a small commission at no extra cost to you. I only recommend products I actually use.
Did you find this helpful?
Your support keeps this blog running and ad-free content coming.
☕ Buy me a coffeeMost Popular Posts
- Custom Metaclass in Python: 43% Faster Validation (12,905 views)
- Python match-case: 7 Patterns That Beat if-elif Chains (971 views)
- yfinance Alternatives 2026: 7 Free APIs Compared (931 views)
- YOLOv8 INT8 Quantization: 4x Faster on Jetson Orin (847 views)
- PaddleOCR vs EasyOCR vs Tesseract: Why PaddleOCR Is Slower (652 views)